Many years ago, I had repaired a few synthesizers for Bon Harris of Nitzer Ebb. Being a huge fan of theirs I took the opportunity to do the best I could and managed to fully repair a few of them. I managed to repair a very broken EDP Wasp (still my favorite synthesizer), Sequential Circuits Pro One and a Roland SH-101. So, I’m not afraid to mildly electrocute myself or burn my hands on a hot soldering iron. I’ve had extensive self-training in tearing electronics apart, to repair, modify or upgrade. I can read a schematic just fine, but only recently got an oscilloscope, so my former repairs worked fine, but probably needed a proper tune up with the scope.

I was recently offered the chance to repair an original Arp Odyssey 2800 MK1, from 1972. I jumped at the repair, so I can jam with my grandson. The power switch lit up when I plugged it in, but no sound out of any outputs. I immediately noticed that once it warmed up, the whole synth smelled funky. It really needed a bath.So, time to take it apart! It took my more time to find the right the right size bit to remove the screws than it did to remove the cover and all the boards.

Pro tip: If you’re going to attempt a repair like this, take photos of all the connections for reference when putting it back together. A reversed connection could cause more issues later. I gave all boards and keyboard a bath in the dishwasher. Yes, the dishwasher. Twice. It worked fine and no more funky smells, dead spiders and dirt anywhere to be seen. It now looks new and shiny. I used Goof-Off on the front panel, as there was so many scuffs and sharpie marks. Someone had written $30 on the front. Was this found at a garage sale or something for $30? What a treasure.

I was really hoping there was just a loose connection and this would be easy to repair. After watching some great Arp repair videos, here and here. I very closely examined every solder joint and all molex connections for any breaks, or loose connections.

There were a few that could be more snug, but still no sound. I did notice that the high out was connected directly to the board, which appeared to bypass the filter, which was not a great sign. So, someone had previously attempted a repair on this unit, which wasn’t a good sign. Now I have to closely examine every component and wiring on each board to confirm it was correctly done, per the schematics and wiring diagrams. Luckily, I found this site, which has a great archive of the repair manual and schematics, with photos.
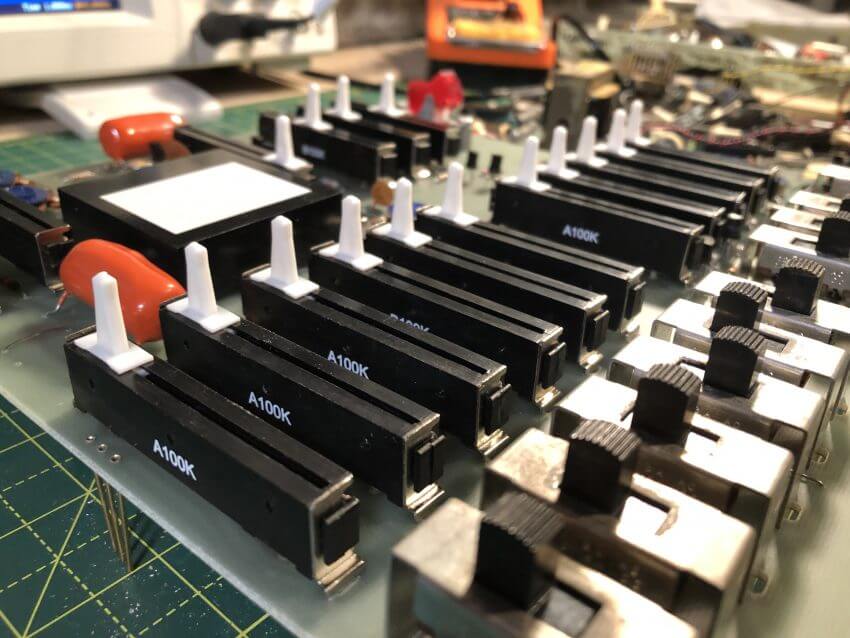
Even after my dishwasher treatment, every slider and knob was gunked up with greasy dirt. In trying to save a $275 to replace all the sliders, I sprayed half a can of contact cleaner in them, but only a few loosened up. They were stuck or very glitchy. I ended up purchasing a full set of new sliders from Synthchasers.com. I also ordered replacement ICs, and should have ordered the capacitors as well…More on that later. These shipped quickly and I began to de-solder the old grungy sliders. I used my favorite desoldering pump and went to work.


After the slider installation, I plugged my speakers into the outputs and managed to get sound out of one of the outputs. So, why isn’t the other output working? The sound is continuous, even without a key pressed. Although, when I press a key, a new sound is created and the ADSR sort of works. With a voltmeter, I adjusted the power supply trimmers to get exactly + and – 15Volts to the boards, while they were plugged in, to account for any voltage drop during operation.

The sound output was still really glitchy, but way better than it was. Before wasting time going through the repair manual and trying to adjust all trimmers and check outputs, I decided to change out all the ICs.

I used my favorite solder removal tool once again and replaced them all. This was not a fun job. Way too meticulous and took hours to do.

After soldering all the ICs in, I tried one more sound test. Finally getting some cool sounds out, but still the continuous sound. Most sliders now seem somewhat functional, expect for the filter and VCA controls. It seems that the Arp 4023 filter is dead, or was bypassed. What I should have done was replace all the capacitors, so I placed a new order with Synthcasers.
Repair is currently on hold, waiting for capacitors and a 4023 filter replacement that I found on Reverb.com for $100, shipping from the UK so this may take another week. To be continued in part two…


As a fan of john foxx and gary numan it’s interesting to see the electronic insides and study the circuit diagrams to see what made the grat sounds the analogue electronics is easy to understand and gives a great organic sound
As a fan of john foxx and gary numan it’s interesting to see the circuits of the synthesizers they used what is the arp filter is it a hybrid module